Wide Area Composites
Building Wide-Area Composite Images
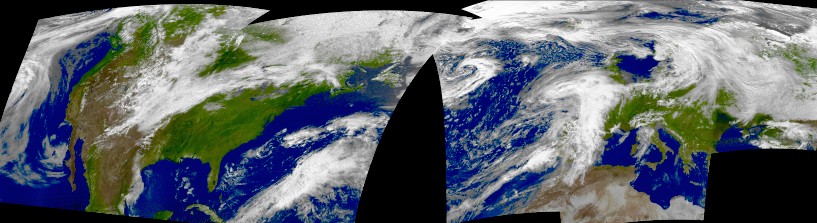
WXtoImg has the ability to combine images from multiple ground stations into very wide-area composite images. With images from enough ground stations it would be possible to produce an image that covered the globe.
Pristine images, available on on many websites, and raw images can be downloaded and processed by WXtoImg almost identically to locally recorded images. By obtaining pristine or raw images from other WXtoImg sites, it is possible to create composite images that cover a much wider area than a single ground station could cover.
- You’ll need a registered version of WXtoImg, and version 2.10.6 or later to perform this task. Firstly, in Options -> Projection Options you’ll need to set the following
- Reference Latitude: in general, should be set to a latitude that is within the north and south boundaries below
- Reference Longitude: this must be set to a longitude within the west and east boundaries below (use something near the middle if in doubt)
- North Boundary (latitude): The northern latitude limit of the projection (use negative numbers for degrees south)
- South Boundary (latitude): The southern latitude limit of the projection (use negative numbers for degrees south)
- West Boundary (longitude): The western longitude limit of the projection (use negative numbers for degrees west)
- East Boundary (longitude): The eastern longitude limit of the projection (use negative numbers for degrees west)
- Scale: Images can get very large, using a scale of about 1.0 will preserve most of the detail, but using a scale of 0.8 or 0.5 or even 0.25 is not unreasonable, alternatively you can set the width of the desired image in pixels (e.g. 1024)
- Select Options -> Save Options. Note that these projection boundaries won’t affect WXtoImg’s production of composite images during auto processing.
- Set Projection to Eckert IV or Eckert VI or Mercator. Some projections like Orthographic produce very curved and distorted images when the composite image gets very wide.
- It is a good idea to set Contrast to none or Linear (constant) and Illumination Compensation to Full so that the images will blend together nicely.
- Set Enhancement to whatever you like (except Pristine).
- Now build the wide-area composite image by opening pristine (or raw images) using File -> Open Raw Image. (You can also open your own audio files for this step.) A large image will be created, mostly black.
- Choose File -> Composite image to… and save this. It is preferable to use a .PNG extension if you plan to put together more than about 8 images. Using a .JPG extension is less desirable, because JPEG images are lossy and the loss increases each time you add an image.
- Repeat steps 6 and 7, compositing the image to the same file you chose the first time you performed step 7. Note that you will be prompted if you want to replace the image, choose OK, it won’t replace your composite image, just merge the new image into it.
- To view your composite image, select File -> View Image and select the file your created (or look in the Composites tab).
- You can increase the contrast in the final image (you’ll likely want to do this if you selected none for Contrast in step 4), by selecting Histogram Equalise Image from the Image menu (and saving the resulting image.) Alternatively, you could select Increase Contrast from the Image menu several times.