WXTOIMG FAQ version 2.10.11
Recording
Why do I get a message "Warning: couldn't find telemetry data" when WXtoImg displays an image?
You need to adjust the sampling frequency. Information on adjusting the sampling frequency can be found in the Required Calibration... document under the Help menu. Also see the Slant Correction section in this manual.
Why do I get "Error: waveInOpen failed!" when WXtoImg tries to record?
Open Record Options in the Options menu, and change the soundcard (even if your PC only has one soundcard you may need to change this for recording to work). Click OK and enter record mode again to test. Try all soundcard values until you find one that works. If this fails to eliminate the problem you may need to install or re-install the latest drivers for your soundcard.
Why does recording never start?
Ensure that the audio cable from the receiver is attached to the soundcard Line 1 input. Ensure that you have used the speaker (and not line) output from the receiver. Follow the instructions carefully in the Required Calibration... section under the Help menu.
Why is the image split (sometimes referred to as sync loss)?
The image looks as though it has been cut horizontally and the upper or lower portion shifted left or right. This may occur in just one place or in multiple places in the image.
Under Options, enable Resync which will correct most of these problems.
However it is best to minimise the occurrance of these splits in the first place. The problem is caused by other programs doing a lot of activity or using a lot of CPU or memory or performing a lot of disk i/o while WXtoImg is recording. Limiting the number and activity of other programs while WXtoImg is recording should eliminate the problem. Some screen savers can also cause this problem, so setting your screen saver to none would be a good idea.
Why does the program "hang" with a "Status: opening soundcard..." message?
The soundcard is in use by another program (possibly even the mixer). Close other programs (including the mixer if it is running).
Why does recording start immediately and never stop recording when I try to record signals from polar orbiting satellites?
Most likely your receiver does not have squelch on the audio out. Select either the Record when 2400 Hz carrier present or Record only when selected active APT satellites are overhead mode.
Why does it never stop recording when I try to record signals from geostationary satellites?
You need to select the Record using WEFAX start/stop tones mode in the Recording Options... dialog under the Options menu.
Why do I only record every other image from geostationary satellites?
Processing is taking too long. You can reduce processing time by disabling Options -> Despeckle (or setting it to none). Despeckle is generally inappropriate on WEFAX images because it degrades the fine lines in the maps. Setting Options -> Sharpen to none will marginally improve processing speed.
You can further reduce processing by setting Maximum number of thumbnails to 0 in GUI Options in the Options menu.
Also ensure that you have not selected Use for audio recordings/maps too in File Names and Locations under the Options menu. Renaming these files requires significant extra time. Finally reduce the number of autoprocessing images and steps performed under Record in the File menu.
If your computer still isn't fast enough to complete processing before the next image arrives consider upgrading your computer. Alternatively you can select Record only (show image if enabled) from Record under the File menu. In this mode, only audio files can be saved, but the program will show the image as it is being recorded.
The program tries to record polar satellites at the wrong time, what needs to be done?
Check your time and timezone setting are correct. On Windows open the Date/Time control panel (Start -> Settings -> Control Panel -> Date/Time), ensure that the "Time zone" is for a nearby city, that "Automatically adjust clock for daylight savings changes" is selected, and that the time is correct.
On Windows, check your autoexec.bat file for a setting starting with SET TZ=. This will override the timezone settings set in the Windows control panel and can cause problems for WXtoImg. Remove the line or comment it out.
How can I automatically remove the older images and recordings?
Select Record from the File menu. There are separate options for when to remove audio files, raw images, maps, and images. Choose a time for these to be deleted. Select Accept, then select Save Options from the Options menu. Note that files are only deleted if they have been created automatically by WXtoImg. If you use Save Image as or Save Raw Image as the files created will not be automatically deleted. Audio files created by other programs will also not be deleted.
Image Slant
Why do I get a message "Warning: couldn't find telemetry data"?
You need to adjust the sampling frequency. Information on adjusting the sampling frequency can be found in the Required Calibration... document under the Help menu. Also see below.
Why are my images slanted?
You need to adjust the sampling frequency. Information on adjusting the sampling frequency can be found in the Required Calibration... document under the Help menu. Also see below.
I can't find a vertical edge in the image to use for slant correction.
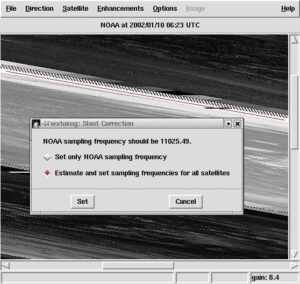
Ensure you have selected Disable PLL from the Options menu, and then selected Slant Correction from the Image menu.
This is because your soundcard is sampling very far from the 11025 Hz that it should be. This isn't a problem. Your image will have sloping horizontal lines running through it. Instead of dragging a line along a vertical edge, just drag a line along one of the sloping (near horizontal) lines from left to right across the image.
Next select Estimate and set sampling frequencies for all satellites and click on Set.
Choose Decode from the File menu and repeat the procedure. This time the edges should be near vertical.
Remember to ensure Disable PLL is not selected and then choose Save Options from the Options Menu to save the slant correction settings.

Example of a line dragged along a near horizontal line.
Select Estimate and set sampling frequencies for all satellites and click on Set.
Map Overlays
Can WXtoImg produce map overlays from recordings made by other programs?
Yes. However it may be necessary to change Audio file naming to Other, in the File Names and Locations dialog under the Options menu. This often needs to be done even if the filenames are MMDDHHMM.wav (month, day, hour, minute) because WXtoImg requires that this date be the time of the start of the recording and not the time when the satellite came over the horizon.
Why do I not see map overlays and often get a message that WXtoImg "could not find matching pass to build overlay map"?
Ensure that you have set the latitude and longitude under Ground Station Location... in the Options menu to match your location.
Also check that the appropriate satellite type is selected in the Active APT Satellites sub-menu in the Options menu.
It could also be that your computer's clock is off significantly (5 minutes or more). See Why are the maps never aligned correctly below.
Finally, your timezone setting may be incorrect so that the calculation of UTC time will not be correct. On Windows open the Date/Time control panel (Start -> Settings -> Control Panel -> Date/Time), ensure that the "Time zone" is for a nearby city, that "Automatically adjust clock for daylight savings changes" is selected, and that the time is correct.
Note that the Ground Station Location, needed for generating maps, is not used in determining UTC time.
Why are the maps never aligned correctly?
The most common cause is that the computer's clock is off by more than a 250ms (a quarter of a second). In order for overlays to be aligned accurately the computer's clock must be very accurately set. On Windows XP and Windows Server 2003, WXtoImg can set the clock to an Internet time source. See Internet Options in the Options menu. Upgraded versions of WXtoImg can synchronise the PC's clock to a GPS. If you are recording on a different computer, then the clock on the recording computer must be set correctly.
My clock is accurately set, what other causes are there?
Using out-of-date Keplers will also cause the maps to be incorrectly aligned. Just use the Update Keplers option under the File menu.
Also if you use recordings that were copied from some other place, then the timestamp on the recording may be affected resulting in maps which are significantly mis-aligned. Look for a copy program that preserves time-stamps (under *NIX use cp with the -p option, or use mv instead).
What can I do about overlays that are still missing or not correctly aligned?
Use the Move Overlay... option under the Image menu to move incorrectly aligned overlays.
On Windows, check your autoexec.bat file for a setting starting with SET TZ=. This will override the timezone settings set in the Windows control panel and can cause problems for WXtoImg. Remove the line or comment it out.
Check that your Internet firewall is configured to allow connections from WXtoImg (xwxtoimg.exe), so that the Keplers can be updated.
Keplers
How often should I update the Keplers?
In order to avoid having to move the map overlay, Keplers should be updated every few days. Connect to the Internet, then select Update Keplers from the File menu.
I cannot update the Keplers, what's wrong?
Check your Internet connection. If it is OK and Update Keplers fails it is likely because your Internet firewall is not configured to allow xwxtoimg.exe to make connections to the Internet (via HTTP port 80). Check your Internet firewall manual for details.
I do not have access to the Internet, how can I update the Keplers?
If you have email access and can get the Keplers emailed to you or sent on floppy disk or other media, then simply copy a file of two line elements into \Documents and Settings\...your name...Application Data\WXtoImg\weather.txt under Windows, or ~/.wxtoimg/weather.txt under *NIX.
General
Why do I get the warning message "enhancement ignored: could not find a NOAA sensor 2 (or 3) image"?
The operational NOAA satellites send images from two sensors. At night, images from sensor 3 (mid/thermal infrared) and sensor 4 (thermal infrared) are sent. During daylight (and dusk) sensor 2 (visible/near infrared) and sensor 4 (thermal infrared) are sent. The warning indicates that the enhancement you have chosen (from the Enhancements menu) requires a sensor which is not available in the current image. In this case WXtoImg ignores the enhancement chosen and produces a "Normal" enhancement image instead.
I'm using WXtoImg under Linux, and the font sizes are very large (or very small) in some places.
This is because the monitor size is not set correctly in your X-Windows configuration. You will need to add a line (or correct the existing one) that describes your monitor width and height in mm. Edit the X-Windows configuration file (often /etc/X11/xorg.conf) and in the "Monitor Section" add:
DisplaySize 330 210
replacing 330 and 210 with the width and height of your monitor's screen in millimeters. Then logout and log back in.
Why do i get a "Runtime Error!"?
If WXtoImg crashes with a message from the "Microsoft Visual C++ Runtime Library", stating that there was a "Runtime Error!" and that "This application has requested the Runtime to terminate it in an unusual way. Please contact the application's support team for more information", then you have a video driver problem.
Obtain and install the latest drivers for your graphics card/chipset. In most cases this will solve the problem. However, the issue surrounds displaying large images or many thumbnails in WXtoImg, so you can work around the problem, by decreasing the Maximum number of thumbnails in GUI Options to 100 or less (sometimes 50 or less). And if you are performing image projection changes, by reducing the Projection scale.
How can I get images that show exactly the data that was received from the satellite?
Set Enhancement to Pristine and enable Show All in the Options menu.
Can I process old .WAV files from satellites that haven't transmitted for a long time?
Yes. First enable expert mode in GUI Options under the Options menu. Exit WXtoImg and start it again. Now select the satellite you wish to process the WAVE file for from the Satellite menu. Open the WAVE file using Open Audio File in the File menu.
If the program fails to build a map, it is likely because the date/time stamp on the WAVE file is not correct. You'll need to ensure the file is named YYYYMMDDHHMMSS.wav for the UTC time it was recorded (i.e. 19990928025912) for 28 September 1999 02:59:12 UTC. Be as accurate as possible with the time, but generally +/- 5 minutes will be OK (however you will have to move the map using Move Map Overlay from the Image menu). Now open File Names and Locations from the Options menu and set Audio file naming to YYYYMMDDHHMMSS UTC time. Click OK. Finally open your renamed file using Open Audio File.
Why are some menu items gray and not selectable?
These items are available only in the upgraded version. Information on upgrading is available on the downloads page.
Note that while in record mode or when images are being processed all of the options except Help, Stop, and Exit are gray.
How do I display local time instead of UTC time?
This applies only to copies of WXtoImg with an upgrade key installed. Disable the Show time as UTC setting in GUI Options in the Options menu.
To change time on the text overlays (only), Open Text Options from the Options menu. Replace UTC with %@%Z or %@local or use %@ followed by your time zone (e.g. %@EST). Select OK.
Hints for improving image quality.
If you are using a narrow bandwidth scanner or communications receiver, then purchase an upgrade key, open Recording Options, and set receiver type to Scanner or Communications. By doing this, the software will use special processing modes to dramatically improve image quality with colour enhancements. If you have a computer control cable for your receiver and the receiver is shown in the list, then select the specific receiver instead. Even better images will be obtained when WXtoImg can control the receiver. Purchase the upgrade only when you have clearly recognisable images using the Contrast enhance (NOAA ch B only) option.
For APT images set Despeckle to 2.0 in the Options menu to help eliminate some of the random noise. For WEFAX images Despeckle should usually be set to none.
On upgraded versions, set Minimum Solar Elevation for visible images to 15.0 in the Record dialogue in the File menu.
Set Illumination Compensation to Full or Med or any other choice than None when Contrast is set to Linear (constant).
If you are producing an image for printing, set Gamma to none in the Options menu, and save the file as a PNG file (by placing .png on the end of the filename).
If you are creating movies/animations, etc AVI Codec to RGB in Image and Movie Options in the Options menu. This will create much larger animations, but will greatly improve the quality. Note that you'll have to delete your existing animations before the change takes effect (the codec is only set when the animation is created for the first time).
When using one of the Anaglyph enhancements from NOAA satellite passes at dusk or night, enable Use other sensor in the Options menu. Also save your anaglyph images as PNG or BMP files (just use a .png or a .bmp extension. This is usually necessary because the lossy JPEG format can cause colour shifts that adversely affect the 3-D effect.
To remove the noisy portions of the image at the top and bottom, open the Recording Options... dialog in the Options menu and select Record only when selected active APT satellites are overhead, then set record only when satellite is above (degrees) to about 15. This will ensure that recording only takes place while the satellite is at least 15 degrees above the horizon. Note that the best value will depend on your environment and receiving equipment (values between 8 and 18 would be typical).
How can I create images that I can import into Digital Atmosphere?
This applies to upgraded versions only. Enable DA compatible BMP format in Image and Movie Options in the Options menu. Set Projection to Orthographic. Open Projection Options from the Options menu. Set Scale to 640 (or if you've changed the map width use the width of your DA map is in pixels). Look at the DA map and guess as closely as possible the most northern and southern latitudes and the most eastern and western longitudes (in degrees and decimal degrees). Use these values (negative for south and west, positive for north and east) for the North, South, West, and East boundaries. Set the Reference Longitude to the longitude at the centre of the DA map. Set the Reference Latitude to the latitude at the centre of the DA map.
How do I print an image?
Because WXtoImg has no built in print facilities, you must first save the image to a file (select Save Image As under the File menu). End the filename with .png or .bmp to create a PNG or BMP image rather than the default JPEG (this will improve print quality). You may also want to set Gamma to none in the Options menu before saving the image. Once the image has been saved you can open it with a variety of programs, including photo editors or your Internet browser and print it.
Why do the colours on my screen go strange when I run WXtoImg?
This is because you have a graphics adapter set to 256 Color (8-bit) mode. WXtoImg grabs all 256 colours for it's own use -- which allows it to display much better images. You could try changing the display settings to True Color (24 or 32 bit) or High Color (15 or 16 bit). If your display adapter is not capable of more than 256 colours and you really dislike this feature, it can be disabled by un-selecting Use private colormap, under GUI Options in the Options menu. Remember to Save Options, then exit and restart the program.
What does northbound 51 W mean?
This is a description of the satellite pass. Southbound or northbound indicates the direction the satellite is traveling. The maximum elevation (in this case 51 degrees) is given next. Note that the maximum elevation will be between 0 and 90 degrees (with 90 indicating a direct overhead pass). This is followed by an either E (east) or W (west) to indicate if the satellite is traveling to the east or west of you (at the time of the maximum elevation).
I just want a nice false coloured image. How do I do that?
During the summer when images are well illuminated by the sun, the MSA Multispectral analysis, HVC, and HVCT enhancements on NOAA satellites give good results. Select these under the Enhancements menu.
During the winter or summer, day or night, the MCIR and NO enhancements on NOAA satellites gives good results.
What does WXtoImg mean?
WXtoImg is shorthand for "WX to image" (weather satellite to image).
AVI Animations
Can I build movies from polar orbiting satellites?
Yes, if you have purchased the upgrade. Here's how to do it:
Open the Image and Movie Options... dialog under the Options If you would like high quality movies or wish to view 3-D movies using one of the Anaglyph enhancements you might want to change the AVI Codec to RGB. (This will result in movies which are very large, but will provide a better 3-D effect.) Otherwise use the MJPG codec. Select OK.
Open the Record dialog from the File menu. Ensure that Record and auto process is selected. Ensure Create Movie(s) is selected. Then click on the Movie Settings button.
Select the enhancements you would like for the movie. A movie will be made for each selected enhancement. The best enhancements for AVI movies would be MCIR map colour IR (NOAA), Contrast enhance (NOAA ch B only), Sea Surface Temp, Anaglyph false 3-D, Colour anaglyph false 3-D, NO colour IR enhancement, and ZA general IR enhancement. You may also get reasonable results with the HVC false-colour and HVCT false-colour enhancements.
Click on the Easy Set Defaults button.
Select Set.
Set the Minimum percent of projection filled to 50.0 so that frames with less than 50% of the pixels filled will not be added.
Now click on the Record button. Each time a satellite passes a frame will be added to movie(s). You can view the movies that have been produced by selecting View Movie from the File menu.
Can I build movies from a bunch of old images, raw images or recordings?
Yes, if you have purchased the upgrade and if using processed or raw images, the images were produced by WXtoImg.
Select Linear (constant) from the Contrast sub-menu in the Options menu. This helps to ensure that each frame in the animation will have similar brightness and contrast.
Select Full from the Illumination Compensation sub-menu in the Options menu. This also helps to ensure that each frame in the animation will have similar brightness and contrast.
Open the Image and Movie Options... dialog under the Options menu. Change the AVI Scale to 1.000. (If you wish to alter the size of the movie, use the Projection Scale in the Projection Options dialog under the Options menu instead.) If you wish to view 3-D movies using the Anaglyph enhancement you might want to change the AVI Codec to RGB. (This will result in movies which are very large, but will provide a better 3-D effect.) Otherwise use the MJPG codec. Select OK.
Open the Projection Options dialog from the Options menu. You can change the Centre Longitude if desired to some longitude near you, or leave it blank. Now set the North, South, West and East boundaries. Try setting them to about 10 degrees north, south, west and east of your location. Latitude and longitude must be entered as a decimal number in degrees and fractions of degrees. Use positive numbers for north and east, negative numbers for south and west. You must enter a value for all four bounds. Select Set.
Under the Projection menu, select Mercator (or any projection other than Normal).
Under the Enhancements menu, select then enhancement you want to use for the movie. The best enhancements for AVI movies would be MCIR map colour IR (NOAA), Contrast enhance (NOAA ch B only), Sea Surface Temp, Anaglyph false 3-D, NO colour IR enhancement, and ZA general IR enhancement. You may also get good results with the HVC false-colour and HVCT false-colour, and Vegetation enhancements.
Now open a recording using Open Audio File, a raw image using Open Raw Image, or a processed image using View Image from the File menu. When processing is complete, select Save Image from the File menu. Save the file to an AVI movie by setting the filename extension to .avi (e.g. noaa-za.avi).
Repeat the previous step for other recordings, raw images, and movies, saving them to the same filename. When prompted to overwrite the file, select yes. AVI movies are not overwritten, instead a frame will be added to the end of the movie.
When you have added all the images, select View Movie from the File menu and select the file you just created.
OK, but isn't there an easier way to build many different AVIs from old images?
Yes. Follow the instructions for Can I build movies from polar orbiting satellites? but in the last step, click on the Accept button rather than Record button.
Now open a recording using Open Audio File, a raw image using Open Raw Image, or a processed image using View Image from the File menu. Once processing is complete, select Auto Process from the File menu. Repeat.
I cannot display the AVIs using Windows Media Player.
Unfortunately, older versions of the Windows Media Player do not support the MJPG (Motion JPEG) encoding which is the default in WXtoImg version 1.0 and above. A special codec is needed for Windows Media Player to play these files. You can get this MJPG codec by installing Microsoft Direct X version 8.0 or above. Available from:
http://www.microsoft.com/directx
Note that Windows 95 users must download a different version of Direct X, and Windows XP users do not need to install this.
If you still have trouble, check your display settings (Start -> Control Panel -> Display -> Settings, or on XP: Start -> Control Panel -> Appearance and Themes -> Display -> Settings) and set the colour quality to 32 bits or 24 bits.
Alternatively, the Apple Quicktime player for Windows works fine. It is available from:
http://www.apple.com/quicktime/download/
Finally, you could select Image and Movie Options... from the Options menu and set AVI Codec to RGB. This will create very large uncompressed animations, but this format is supported by almost every AVI viewer.
Note the Linux/*NIX xanim player supports the MJPG encoding method used.
Can I build movies of images from geostationary satellites?
Yes. Here's how to do it:
First, open the Recording Options dialog from the Options menu. Select Record using WEFAX start/stop tones. Select OK.
Select Linear (constant) from the Contrast sub-menu in the Options menu. This helps to ensure that each frame in the animation will have similar brightness and contrast.
Open the Image and Movie Options... dialog under the Options menu. Set the AVI Scale to 0.500. Select OK.
Open the Record dialog from the File menu. Ensure that Record and auto process is selected. Ensure Create Movie(s) is selected. Then click on the Movie Settings button.
Set the Movie Filename Template to %s-%l-%C-%e.
Select the enhancements you would like for the movie. Only some of the enhancements apply to geostationary satellites. If in doubt, just select Normal. Select OK.
Now click on the Record button. Each time an image is decoded from the satellite it will be added to the appropriate movie. A different movie will be created for each sector, each sensor and each enhancement. You can view the movies by selecting View Movie from the File menu.
Composite Images
Can I automatically build combined images from multiple satellite passes?
Yes, if you have purchased the upgrade. Here's how to do it:
First, open the Recording Options dialog from the Options menu. Select Record only when selected active APT satellites are overhead. Select OK.
If you wish to create composite images using the HVC, HVCT, or Anaglyph enhancements you might want to select the Use other sensor in the Options menu.
Open the Record dialog from the File menu. Ensure that Record and auto process is selected. Ensure Create composite image(s) is selected. Then click on the Composite Image Settings button.
Select the enhancements you would like to create composite images for.
Click on the Easy Set Defaults button.
Select Set.
Note that the Minimum percent of projection filled does not apply to composite images.
Now click on the Record button. Each time a satellite passes the images will be overlaid on the composite images. You can view the composite images that have been produced by selecting View Image from the File menu.
Can I build composite images manually?
Yes, if you have purchased the upgrade.
Select Linear (constant) from the Contrast sub-menu in the Options menu. This helps to ensure that part of the composite image will have similar brightness and contrast.
Select Full from the Illumination Compensation sub-menu in the Options menu. This also helps to ensure that each part of the composite image will have similar brightness and contrast.
Open the Projection Options dialog from the Options menu. You can change the Centre Longitude if desired to some longitude near you, or leave it blank. Now set the North, South, West and East boundaries. Try setting them to about 30 degrees north and south, and about 30 - 40 degrees west and east of your location. Latitude and longitude must be entered as a decimal number in degrees and fractions of degrees. Use positive numbers for north and east, negative numbers for south and west. You must enter a value for all four bounds. Select Set.
Under the Projection menu, select Mercator (or any projection other than Normal).
Under the Enhancements menu, select then enhancement you want to use for the composite image.
Now open a recording using Open Audio File, a raw image using Open Raw Image, or a processed image (from WXtoImg) using View Image from the File menu. Opening audio files or raw images will generally result in better results. When processing is complete, select Composite Image to from the File menu. Better results can be achieved by saving to PNG or BMP files (set the filename extension to .png or .bmp (e.g. noaa-2401.png).
Repeat the previous step for other recordings, raw images, and movies, saving them to the same filename. When prompted to overwrite the file, select yes. Composite images are not overwritten, instead the new image will be overlaid over the previous one.
Better results may be achieved by saving the lower elevation passes first and the highest elevation pass last. This ensures that the best images occupy as much of the composite image as possible.
When you have added all the images, select View Image from the File menu and select the file you just created.
Creating Web Pages
Can I automatically create web pages and publish them?
Yes. Here's how to do it:
Open the Record dialog from the File menu. Ensure that Record and auto process is selected. Ensure Add images to web page is selected. Then click on the Web Page Settings button.
If you have purchased an upgrade key, leave the HTML Template alone for now.
Select the enhancements to use on the web page. When several enhancements are chosen, the first available enhancement is used. Try "MSA,MCIR,contrast", then if the MSA enhancement is available this will be used, otherwise the MCIR enhancement will be used if available, otherwise just a contrast enhanced image will be used.
Choose a thumbnail size. Using 20.0% is recommended, although in some cases you might find larger thumbnails (25.0%) look better.
The HTML Filename is the name of the HTML file that will be created. If unsure, leave this as index.html.
Most Internet Service Providers (ISPs) provide free home page access. Check with your ISP about setting up a home page if you are unsure. Your ISP should provide you with: the hostname for FTP access to your home page (Hostname), a username or login for FTP access to your home page (User), and a password for FTP access to your home page (Password). Enter this information in the locations provided.
For the Directory you should enter the directory where your web page should be placed. If the directory does not exist WXtoImg will attempt to create it. Your ISP may be able to help you choose the directory name for use with FTP. Sometimes it needs to begin with "/public_html/" or "/html/".
If you have an "always on" Internet connection, check the box Automatically FTP as images are added, this tells WXtoImg to update your web page immediately and automatically after each satellite pass is decoded. If you do not select this option you can manually update your web page at any time by selecting Update Web Page from the File menu.
Although this varies considerably from ISP to ISP, your web page may be accessed using a URL similar to (replacing Hostname, User, and Directory):
http://www.Hostname/User/Directory/index.html
or
http://www.Hostname/~User/Directory/index.html
Contact your ISP for more information about using FTP to load your own home page.
If you don't want to publish the web page, you can create it in a folder or directory on your computer:
Ensure the the box Place web page into folder is checked.
Enter the folder where you would like the web page built, you can click the Browse button to select an existing folder. The HTML Filename will be built in this folder (typically index.html).
After entering the FTP settings and/or the folder settings, select OK.
You should be back at the Record dialog. Ensure that "Create Image(s)" is selected. Now click on Image Settings. In the Enhancements section you should select the enhancement(s) you chose for Enhancement to use in the Web Page Settings.
Click OK.
Now click Accept.
Finally select Save Options from the Options menu.
Select Record from the File menu. Each time a satellite passes the images and thumbnails will be created and a web page will be built.
How can I improve the quality of the images on my web page?
For the Enhancement to use (Web Page Settings, under Record in the File menu), select an option that includes visible light imagery (e.g. MSA, MCIR, contrast).
Set the Minimum solar elevation for visible images setting (upgraded versions only under Record in the File menu) to about 15 degrees. This will eliminate poorly lit visible images from being presented on the web page.
If you have selected a projection other than Normal, set the Minimum percent of projection filled setting (upgraded versions only under Record in the File menu) to about 66 percent. This will prevent images with only a small fraction of the image filled from being presented on the web page.
Under Recording Options in the Options menu make sure Record only when selected active APT satellites are overhead is selected. Set with maximum elevation above (degrees) to about 30 to prevent low elevation passes from being recorded and presented on the web page. And set record only when satellite is above (degrees) to about 15 to crop the noisy top and bottom sections of the image when the satellite is not high enough to receive a good signal.
How can I present time as local time on my web pages?
If you have purchased the upgrade, open Web Page Settings from the Record dialog under the File menu. Click the Browse button after HTML Template and select template2.html. Click OK, then click Accept.
If the time is also displayed on the images (text overlay), then open Text Options from the Options menu. Replace UTC with %@%Z or %@local or use %@ followed by your time zone (e.g. %@EST). Select OK.
Can I change the web page layout, number of images, or information on the web page?
Yes, if you have purchased the upgrade. In Web Page Settings in Record under the File menu you will find an option for the HTML Template. This template is the HTML document used to create the web page. You can try the other templates provided (note that the web page will not change until after the next satellite pass).
Or you can create your own template. You may wish to look at the default (template1.html) document as a guide. You can copy this file to another and edit it.
The web page, HTML filename, is created from the HTML Template by substituting text within the template.
The text imageX.jpg will be replaced with the name of an image created by WXtoImg. thumbX.jpg will be replaced with the name of the corresponding thumbnail. X should be a number 1 or greater. The most recent image will be use X equal to 1. You should not leave any gaps in the image numbers. If you want 4 images on your web page then you should have references to image1.jpg, image2.jpg, image3.jpg, and image4.jpg and likely the 4 corresponding thumbnails: thumb1.jpg, thumb2.jpg, thumb3.jpg, and thumb4.jpg.
Information text about the satellite pass or ground station can also added to the web page. INFO(X,Y) in the template will be replaced with the info corresponding to image X (as above the most recent image is 1). Y is a number which indicates the information desired (chosen from the list below). There can be no spaces in this string. E.g. INFO(2, 4) will not be replaced. For Y=4 or Y=44 an optional extra argument can be used which specifies the date/time format (e.g. INFO(1,44,%Y/%m/%d %H:%M %Z)).
     Y  Description
     0  width of image (in pixels)
     1  height of image (in pixels)
     2  width of thumbnail (in pixels)
     3  height of thumbnail (in pixels)
     4  time of satellite pass (UTC)
    44  time of satellite pass (local time)
     5  satellite name (e.g. NOAA 17)
     6  maximum elevation of satellite pass
     7  azimuth at maximum elevation (E or W)
     8  direction of pass (northbound, southbound)
     9  enhancement used (e.g. MSA)
    39  full enhancement name (e.g. Multi-Spectral Analysis Enhancement)
    10  ground station location
    11  latitude of ground station
    12  longitude of ground station
    13  frequency in MHz (e.g. 137.62)
    14  projection name (e.g. Mercator)
    15  channel A (e.g. 3)
    16  channel B (e.g. 4)
    17  language (e.g. en)
    18  character set (e.g. iso-8859-1)
    19  wxtoimg version number (e.g. 2.4.15)
    20  receiver (e.g. R2FX)
    21  pass duration (e.g. 14:59)
    22  solar elevation (e.g. 23.3)
    23  antenna type
    24  estimated time of publication (UTC)
    64  estimated time of publication (local time)
To display information about future satellite passes on your web site you can use X=-1,-2... with X=-1 being the next satellite pass. Y=24 and Y=64 apply only to future satellite passes. The optional date/time format argument can be used with Y=24 and Y=64 as well as with Y=4 and Y=44.
Any of the following can be used in the optional date/time format:
    %a  abbreviated weekday name
    %A  full  weekday  name
    %b  abbreviated month name
    %B  full  month  name
    %d  day of the month
    %H  hour using a 24-hour  clock
    %I  hour using a 12-hour clock
    %j  day of the year (001-365)
    %m  month as a number
    %M  minute
    %p  am/pm designation
    %S  second
    %y  year without a century
    %Y  year including the century
    %Z  time zone name or abbreviation
    %%  a `%' character
Copyright
Copyright (c) 2001-2010 Central North Publishing Limited. All rights reserved.